CREATING IN THE STUDIO
Hi and welcome to my studio, this is my favorite part of sculpting. In my studio with my power tools, in my grungy work clothes, focusing on my work and loving every minute. I have included this page on my website as I wish to share the processes involved with creating and commissioning a sculpture. This page will always be a work in progress as I will up date it as I create it.
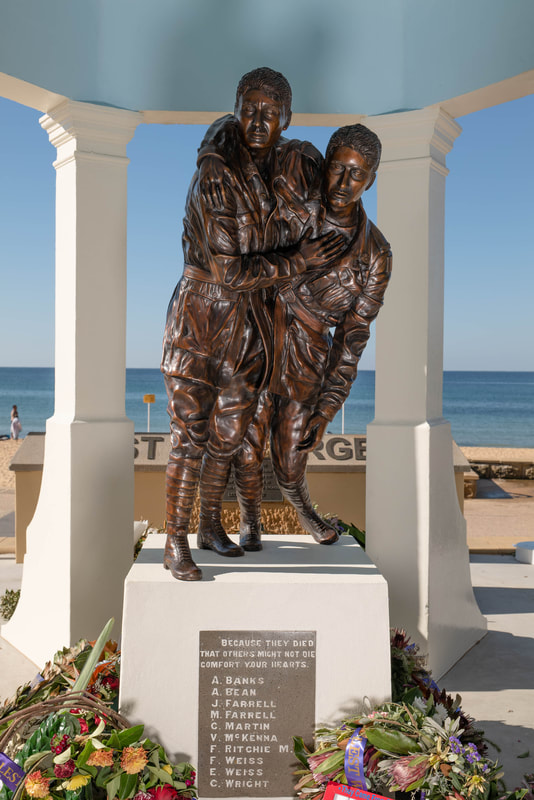
I am going to start with the commissioned sculpture "Brothers in Arms" Bronze, Terrigal Beach Foreshore 2019, and take you through the entire process. including the bronze casting.
BROTHERS IN ARMS BRIEF
Hi and welcome to my studio, this is my favorite part of sculpting. In my studio with my power tools, in my grungy work clothes, focusing on my work and loving every minute. I have included this page on my website as I wish to share the processes involved with creating and commissioning a sculpture. This page will always be a work in progress as I will up date it as I create it.
I am going to start with the commissioned sculpture "Brothers in Arms" Bronze, Terrigal Beach Foreshore 2019, and take you through the entire process. including the bronze casting.
BROTHERS IN ARMS BRIEF
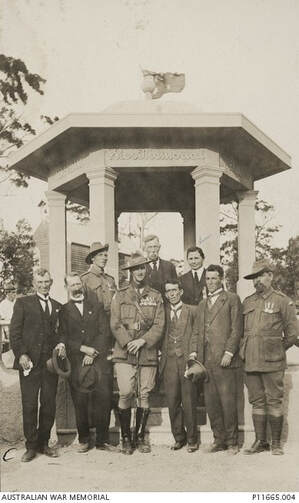 Opening of the Erina District War Memorial November 1923
I was approached by RSL Terrigal/ Wamberal Sub Branch who were currently working on relocating an existing War Memorial, Erina District War Memorial, Erina NSW, a memorial that commemorated the memory of service personnel lost in WWI from the Erina, Terrigal, Wamberal and Matcham areas. The memorial was unveiled on Armistice Day 1923.
RSL Terrigal/ Wamberal Sub Branch was relocating the Erina District War Memorial to Terrigal Foreshore. The memorial was to be re-dedicated on 25th of April 2019 in memory of all men and women and their families, who have dedicated their lives to serve Australia in conflict and peace.
BRIEF
The original plaque was inscribed with the names of ten soldiers from the district that had lost their lives in WWI within this list there was 2 sets of brothers, including Erle Victor Weiss and his brother Frederick Alfred Weiss. The Weiss brother’s father, Walter was President of the committee that built the memorial. Hence the Sub Branch evolved the concept of " Brothers in Arms" and a brief outline of the desired sculpture. The Memorial applies to all service personnel and in particular to those to whom the Memorial was dedicated. The two figures could be depicted in WWI Infantry & Light Horseman apparel. The two figures would be in an ‘arm around shoulder’ pose. The size would be scaled to 50-60% with a height of about 1000 - 1200mm.
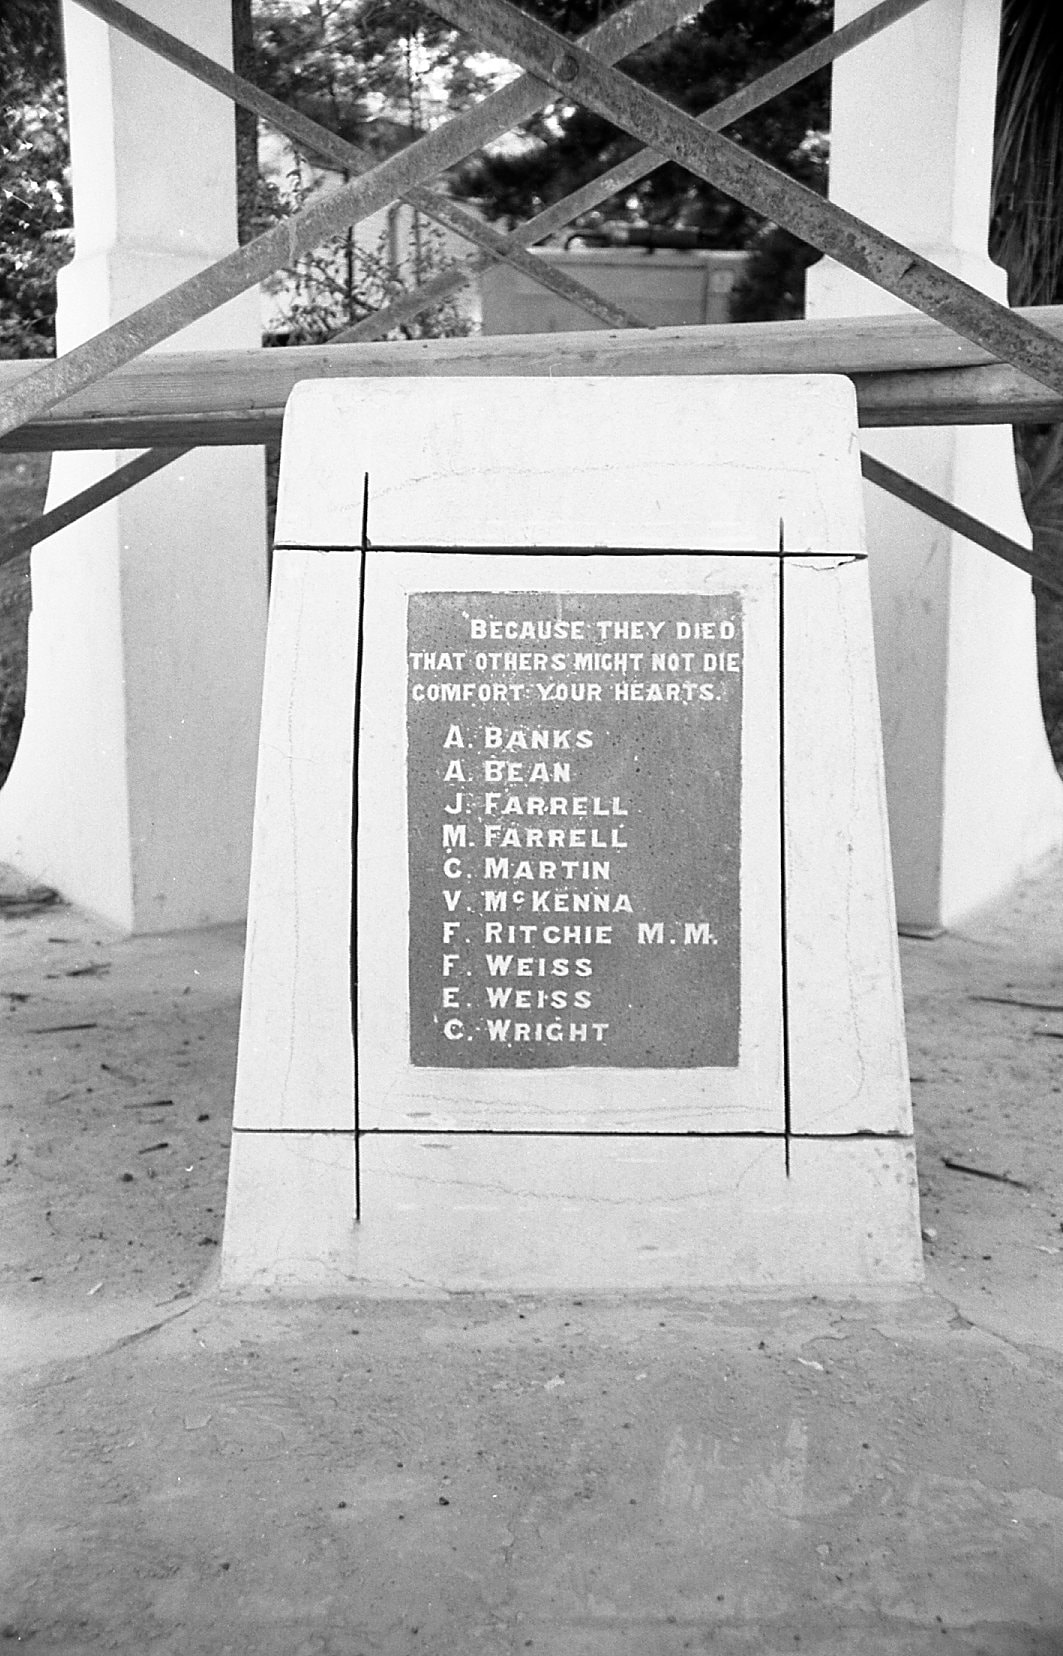
Erina District War Memorial Plaque
|
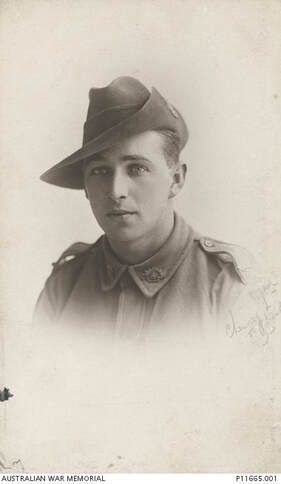
Erle Victor Weiss
|
THE PROPOSAL
 Preliminary composition sketch
When I was first invited to submit this proposal, I was filled with a sense of honour, quickly followed by the excitement of the possibility of accomplishing a long-held dream. The opportunity to honour our Central Coast veterans in a public art war memorial has been a vision of mine for some years now.
Artist Vision
I took into consideration the intended title “Brothers in Arms” and the inscription on the commemorative plague, “Because they died others might not die. Comfort your hearts” and the committee’s vision of 2 figures representing Erle and Frederick Weiss, brothers listed on the honour roll include on the plaque. Brothers in arms, the phrase used to describe the unique bond between those that serve together, the title also holds the ambiguity of representing the many siblings that have served and the ultimate sacrifices made by many families.
I wished for the sculpture to capture a sense of honour, camaraderie and the loss of lives, to reflect on the experiences of those who returned, to depict their efforts made and their sense of loss which is forever with them. I wanted the sculpture to hold this ambiguity, encouraging the viewer to decipher their own connectiveness to the artwork, in a hope that it will resonate with veterans, their families and the community.
Preliminary Composition
I addressed the inscription via the composition of the sculpture. I took some photos of two young brothers. The younger of the two injured, the older determined to help his brother to safety. The right hand of the older brother is placed over the heart of his sibling, depicting that his life is in his hands, their love and symbolic of comforting. They are both looking forward in recognition of their service to country, their ambitions that their sacrifices are not in vain but will contribute to the freedom of their country and to a time of peace.
Moving Forward
I am happy to say my proposal was successful. However moving forward we did collaboratively decide to increase the size of the sculpture to 80% life size and altered the plinth.
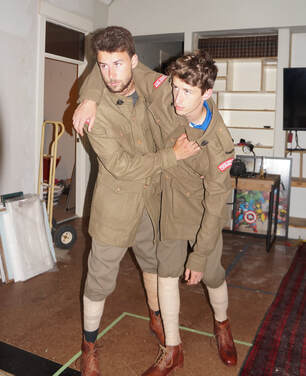
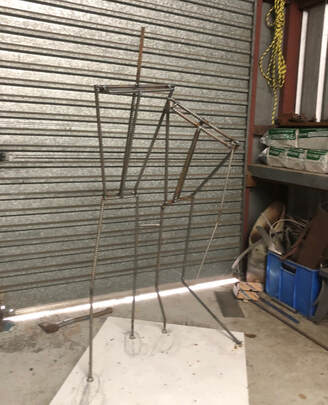
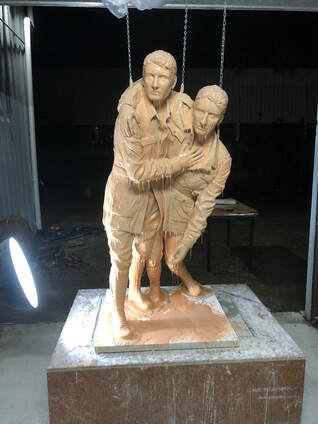
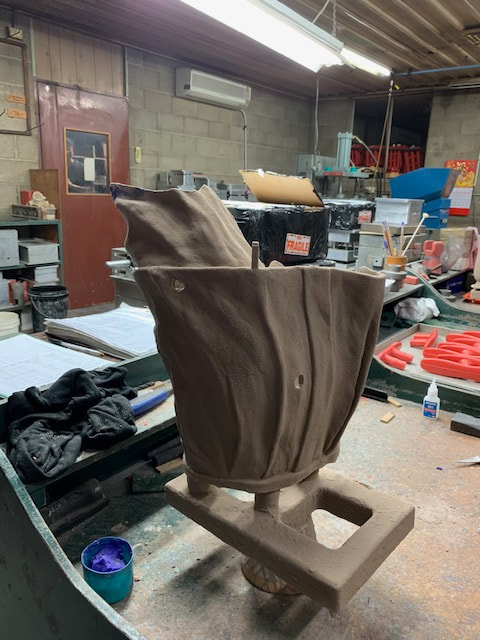
STEP ONE Next step for me was take some more photos of the two young brothers, this time in uniform. This was the image I worked off, along with many others from all directions. Mind you there was a couple of extra photo sessions throughout the whole process. STEP TWO There is a lot of work in creating a bronze sculpture, I used the lost wax process and for such a large sculpture I needed to make a mould so as to cast it in wax. The sculpture is first made from clay and in order to do this you need to make an armature, which is like a skeleton, it provides a sturdy platform on which to build up the clay. It also ensures that the proportions of the figures are correct. The armature was built out of rio steel and chicken wire. |
|
STEP THREE
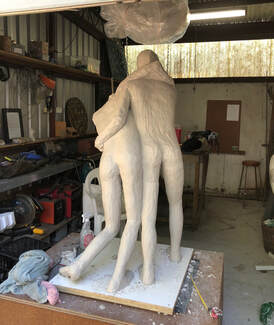
I elevated the sculpture to make it more comfortable to work on, I also attached it to the roof to keep it secure. I was working on this piece December to February and it was a hot summer in a tin shed. I set up a large piece of plastic to cover the piece at the end of each day and constantly sprayed the clay to keep it moist. I constructed the armature so the heads could be removed, this will assist me obtaining the details of the faces. I built up the clay very roughly the details would come later. |
|
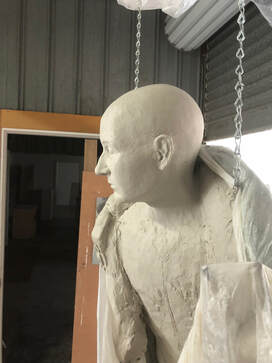
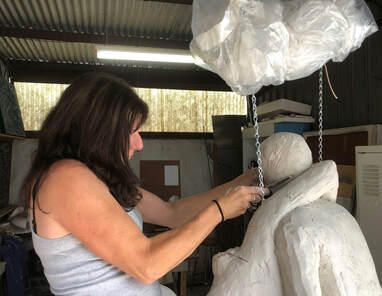
STEP FOUR, Heads Up
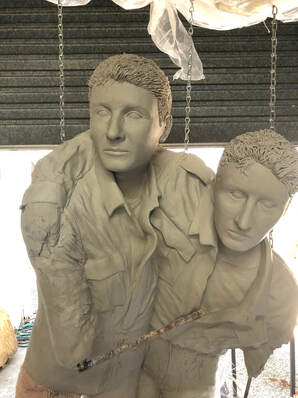
Starting from the top it is time for the detail. As I mentioned earlier I designed the armature so the heads could be removed which I was so grateful for now. This was still a process, I worked on the proportions first which meant placing the head onto the body to make sure the proportions were correct for both the heads. Once I was happy with the proportions I removed the heads and worked on the details. I did revisit the heads later to work on the expressions as I really wanted to capture the scars of their experiences and the hope and determination in their hearts. I asked the models to pose for me one more time with a focus on their expressions. |

|
STEP FIVE, Uniforms and the final touches
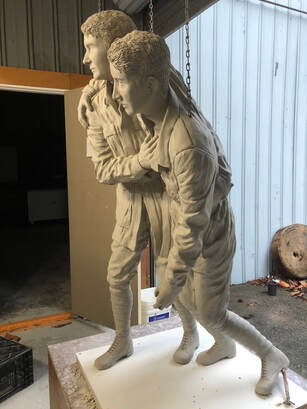
The uniform are a very important part of this sculpture, it is what gives the sense of movement. I also paid a lot of attention to the details, ensuring that the uniforms where a true representation of the WWI Australian uniforms. I did enjoy every moment of creating the uniforms it was very relaxing. Once I was happy with the uniforms I moved on to the finer details in the hands, completed the shoes and went over the whole sculpture checking every detail. The clay component of this sculpture took 3 months to complete, working 6 to 7 days a week and with many long days involved. I was very happy with the end result and now was ready for the mold making process.
|
|
|
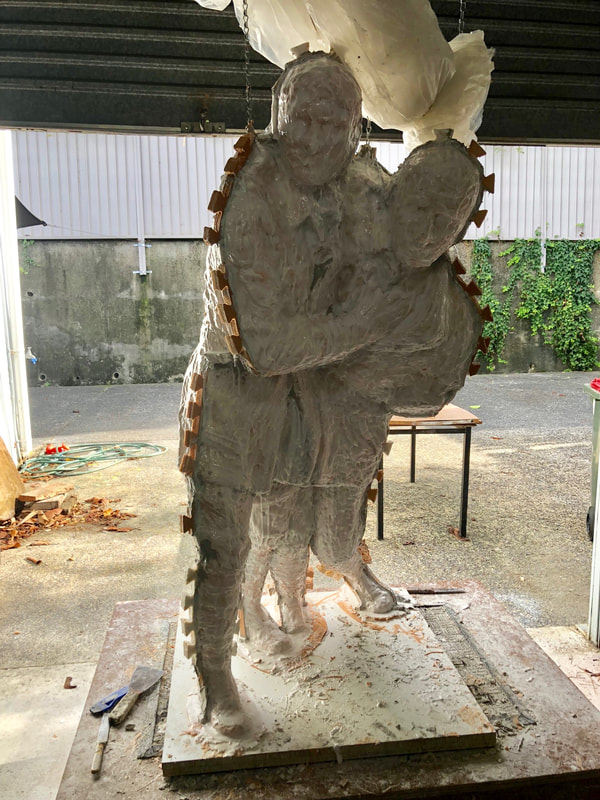
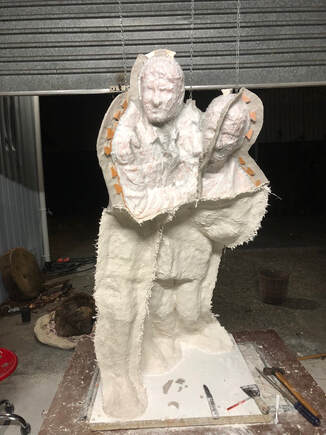
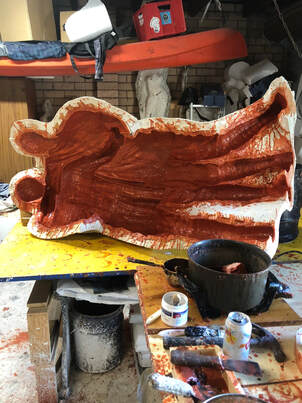
STEP SEVEN, Outer casing
I firstly had to cut off the arm on the second soldier as this would have made the mold a lot more complex. The outer casing consisted of 12 pieces, given the composition of the sculpture and that you need to remove the outer casing without putting to much stress on the sculpture and the individual pieces. A clay wall is constructed, which is later removed, to segregate the pieces. First layer is a splash coat of plaster, this is followed by an acrylic polymer mixed with gypsum and reinforced with fibreglass. In this case most of the pieces have 3 layers of fibreglass reinforcement. Once complete it is left to set for at least 24 hours. Holes are then drilled around the edges of the outer casing, these are for the nuts and bolts to hold the outer casing together. Then it is time to separate the pieces, always a nervous time. All went to plan with only one of the pieces putting up a fight |
|
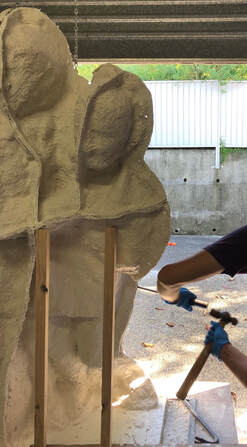
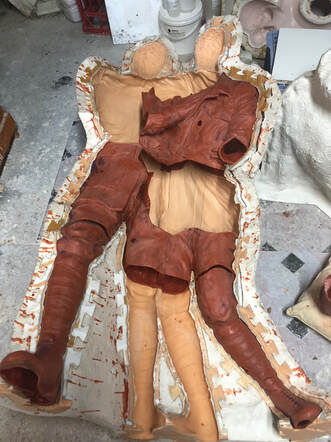
STEP EIGHT, removing the silicone and wax casting
Next is cutting off the silicone, this is done with a scalpel, it is very hard work on the fingers as the silicone is very strong, Once cut the silicone is placed back into the outer casing to retain it's shape. Now it is time to cast the sculpture in wax. For smaller pieces you would totally resemble the mold and slush the wax. Given the size of this sculpture it was resembled into 2 pieces then the wax applied. There are 5 layers of wax and in this case the wax was painted in. The first 2 layers of wax are applied when the wax is very hot, this ensures all the details are captured and eliminates air bubbles, the following layers a much cooler wax coat is applied. The edges are tidied up after the 5th layer. |
|
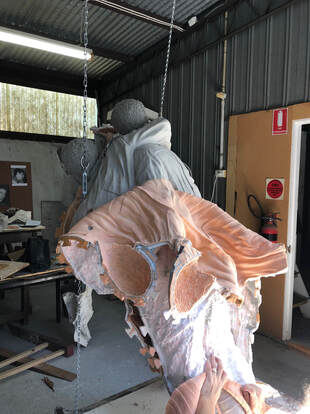
Wax Casting / Foundry
With both sides painted in with wax the wax casting is then cut up into sections, this is done as the foundry accepts pieces no bigger than 40 cm in any direction. The pieces are cut very carefully in the mold, one side is removed from the silicone and placed on top of the other half still in the mold. It is then joined together along the seam with cool wax. Once it is secured it is removed from the mold and braced with thick sticks of wax to avoid distortion. Now clean up the seams and any other imperfections. Then off to the foundry, they attach gates to the wax pieces, the gates are made of wax and will are the points that the hot bronze will be poured. The pieces are then dipped in a liquid then coated in a fine ceramic grit, this is repeated approximately 9 times. This process is done by hand and is a very vulnerable time as the pieces become very heavy and are still fragile. The pieces are then fired, the wax melts out and the ceramic shell hardens. They are then ready for the bronze casting. |
|
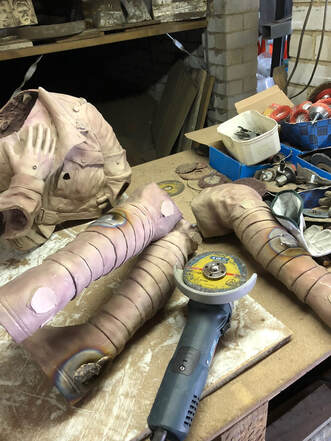
STEP NINE, bronze work
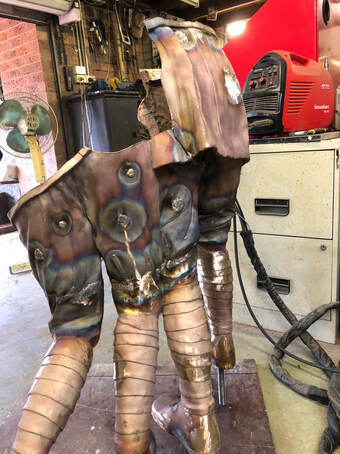
The pieces come back from the foundry with lots of work to be done. First the braces that where put into place to ensure the wax kept it's form are cut off with a grinder. The pouring points of the bronze casting process are also ground down any places that will be difficult to get to once all the pieces are welded back together. The pieces are then welded back together, this does involve some panel beating as well. The focus was on the lower half of the sculpture as a date was set to visit the site and drill the holes for the installation, much easier when the sculpture is half it's weight. Welding in the pins and braces inside the legs for extra strength was also done at this point. As you see lots of welding and days on the grinder involved in in this stage. |
|
STEP TEN
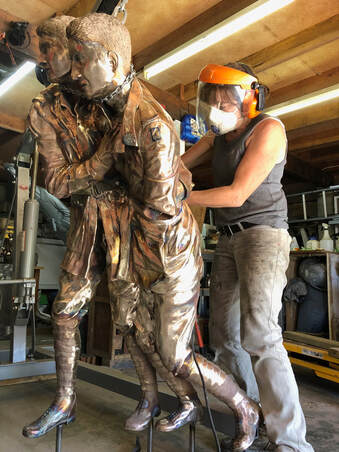
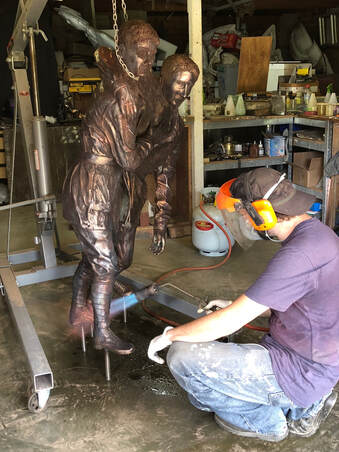
Heading into the last stage, a final go over for the whole sculpture. Ensuring that there are no scratches or marks made by the grinder, polishing the entire sculpture and a final go over with a nylon brush in preparation for the patina. The patina acts as a protective coat and adds colour to the piece Throughout the creation of this sculpture I have done 90% of the work, I did have the assistance of Michael Vaynman. Michael is an expert mold maker, bronze worker and is one of Australia's finest when it comes to patinas Michael completed all the welding, gave me guidance with the mold and did the patina. Patina Process- Firstly the sculpture is heated, the heat enhances the patina as well as speeds up the process. The patina is a chemical process which is sprayed on. Different chemicals create different colours. For this piece a traditional patina was used. The first chemical application was a very dark brown, this was then rubbed back to add highlights, the sculpture was then reheated and the second chemical mix was applied, a golden tone enriching the highlights. Finally a coat of wax is applied and buffed back. All that is left now is the installation |
|